You use the Enter Goods Received Line screen to add and maintain the items you want to include in a goods received batch. If you have loaded a purchase order into the goods received batch, you can add, edit or delete the purchase order lines. If you are manually creating the goods received batch because there is no purchase order in Micronet, you can add the lines you are receiving.
Refer to "Creating a New Goods Received Batch" or "Recalling a Goods Received Batch".
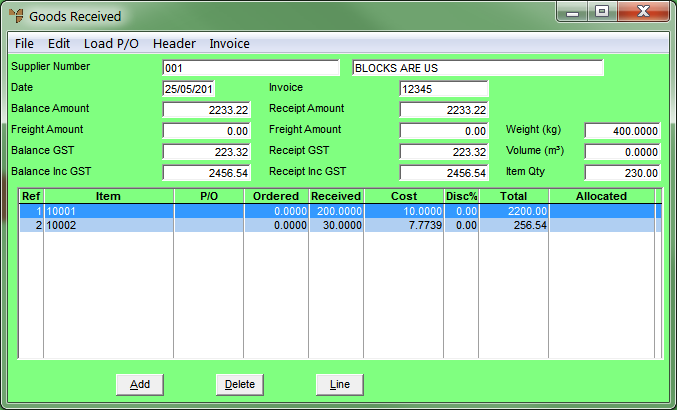
Micronet displays the Goods Received screen.
|
|

|
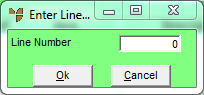
Technical Tip To edit an item, you can also select the item then select the Line button. Micronet displays the Enter Line Number screen.
Enter the number of the line you want to edit and select Ok. |
|
|
|
Technical Tip If you have loaded a purchase order into the goods received batch and you delete an item line, Micronet returns the line to the purchase order for receiving at a later date. 2.8 Feature If your company is using the Procure to Pay feature to capture freight values from purchase orders through to goods receipts on PDAs and in Micronet, and you have loaded a purchase order to receive, you cannot add extra lines to the goods received batch. If you try to add a line, Micronet will display an error message. Instead, you need to create a new goods receipt batch for any extra lines that are not on a purchase order. |
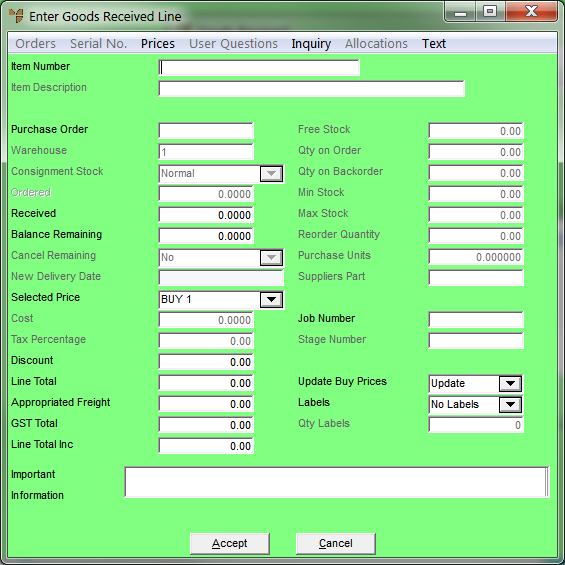
If you selected to add or edit items, Micronet displays the Enter Goods Received Line screen.
|
|
Field |
Value |
|---|---|---|
|
|
Item Number |
Enter the ID of the item being received. You can also press Tab or Enter to select an item. |
|
|
Item Description |
Micronet displays the description of the selected item. |
|
|
|
Technical Tip If you add an item to a goods received batch for a supplier that is not the preferred supplier for that item, and your user security does not allow you to do this, Micronet displays a message that you have insufficient user security to change the supplier. Select OK to display a screen where an authorised user (e.g. a supervisor) can enter their userID and password, allowing you to add the item to the goods received batch. This security feature is set in the Allow P/O creation where presupplier does not match field on the User File Update screen - MDS Security tab (refer to "Maintenance - Edit UserIDs - 4. MDS Security"). |
|
|
Purchase Order |
If you are receiving an item that has been previously entered into Micronet, enter the purchase order number for this receipt. You can press spacebar then Enter to select from a list of purchase orders on file for this item, or you can select the ORDERS menu option. You can use this option even if you have already loaded one or more purchase orders for the goods received batch using the LOAD P/O option on the Goods Received screen. 2.8 Feature If the Multiple Supplier in Receipts field on the Purchasing Configuration screen is set to Yes, Micronet displays purchase orders for all suppliers. You can select one for a different supplier if required. For more information, see "Edit - Program - Purchasing". |
|
|
Warehouse |
Micronet displays the default warehouse, or you can enter the warehouse you want to receive the item into. |
|
|
Consignment Stock |
If your company is setup to receive consignment stock, select whether the goods being received are normal stock or consignment stock. Consignment stock is goods you receive from a supplier but don't pay for until they are sold to a customer. This field is only enabled if the Allow Consignment Stock field on the Inventory Configuration screen is set to Yes – see "Edit - Program - Inventory". |
|
|

|
Reference If your company is configured for multiple bin locations and your userID allows you to edit bin locations, Micronet displays the Bin Locations and Quantities screen – see "Enter Goods Received Line - Selecting Bins and Quantities" for more information. If Micronet has been set up to use the Main Bin Only or Priority Order and you do not have authority to edit bin locations, the selection of bins will be automatic and performed in the background. If the ENTER DEFAULT RECEIPT BIN LOCATION option is turned on on the Goods Received screen, you only need to enter bin locations on lines that will be placed into a different bin to the default bin entered when you post the batch. See "Goods Received - Edit - Enter Default Receipt Bin Location" for more information. |
|
Ordered |
Micronet displays the quantity ordered based on the Purchase Order field. |
|
|
Received |
Enter the quantity of items actually received. If you are receiving less than the purchase order quantity, the Cancel Remaining field becomes active with a default value of No (this does not cancel the remainder of the purchase order). |
|
|

|
Warning If you are using MJC and the item has been allocated to a job, and you then enter a negative quantity in this field to remove the item from the job, when you post the goods received batch as either costed or uncosted, Micronet will display a message that removing stock off a job must be done manually and that the allocations will be removed. To remove the item from the job, you need to load the job in MJC and actually delete the item. |
|
|
|
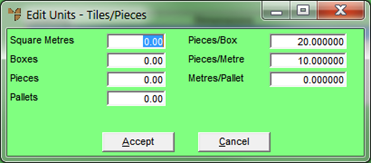
Technical Tip 2.8 Feature If you are receiving an item that has been setup with unit recognition, Micronet automatically displays the Unit Recognition screen so you can enter the quantity received in the appropriate units (e.g. square metres, boxes, pallets, etc.). Select the Add button to display the Edit Units screen, enter the quantity of the item received in the appropriate units then select Accept.
|
|
Balance Remaining |
Micronet displays any difference between the purchase order quantity and the quantity received. |
|
|
Cancel Remaining |
If you have received less than the purchase order quantity, select what you want to do with the balance remaining. Options are:
|
|
|
New Delivery Date |
If you are still expecting to receive the remainder of the order, enter the date by which you expect to receive it. |
|
|
Selected Price |
Select the cost price charged for the items on the supplier invoice. If you want to enter a price manually or change the price displayed, select Nett and enter the actual price in the Cost field. |
|
|
Cost |
If you selected Nett in the previous field, enter the nett buy price for the goods. Otherwise, Micronet displays the cost price. |
|
|
Tax Percentage |
Micronet displays the default GST/sales tax percentage for the item. |
|
|
Discount |
Enter any discount you have received from the supplier on the price of the item, as a percentage. |
|
|
Line Total |
Micronet displays the total cost of the items (Received x Cost - Discount). |
|
|
Appropriated Freight |
Any freight amount appropriated against the order. |
|
|
GST Total |
The total amount of GST included in the order. |
|
|
Line Total Inc |
The line total including appropriated freight and GST. |
|
|
Free Stock |
The free stock quantity of the item. |
|
|
Qty on Order |
The quantity of the item currently on purchase orders. |
|
|
Qty on Backorder |
The quantity of the item on backorder. |
|
|
Min Stock |
The minimum stock quantity. |
|
|
Max Stock |
The maximum stock quantity. |
|
|
Reorder Quantity |
The reorder quantity for the item. |
|
|
Purchase Units |
Micronet displays the unit in which the item is purchased. For more information, refer to "File - Inventory - Purchasing". |
|
|
Suppliers Part |
The supplier's part number for the item. |
|
|
Job Number |
This field is only displayed if you are using Micronet Job Costing (MJC) and the Alternate Job Interface option is selected on the Goods Received screen (for more information, refer to "Goods Received - Edit - Alternate Job Interface"). Enter the job number that this receipt should be assigned to. This information comes from the Item master file and should be displayed in the Important Information field. You can press spacebar then Enter to select from a list of MJC job numbers. |
|
|
Stage Number |
This field is only displayed if you are using Micronet Job Costing (MJC) and the Alternate Job Interface option is selected on the Goods Received dialogue (for more information, refer to "Goods Received - Edit - Alternate Job Interface"). Enter the job stage that this receipt should be assigned to. You can press spacebar then Enter to select from a list of stages. |
|
|
|
Technical Tip If you want to remove a pre-allocation of the item to an MJC job, simply delete the job and stage number. |
|
|
Update Buy Prices |
Select whether you want buy prices updated for this goods receipt. Options are:
|
|
|
Labels |
Select whether you want labels created for this goods receipt and the quantity required. Options are:
When you select any option other than No Labels, Micronet creates a batch with the items and label quantities specified when the goods received batch is posted. To recall this batch for viewing, altering, printing or deleting, refer to "Inventory Reports - Batch Label Report". |
|
|
|
Technical Tip The option displayed in this field defaults from the Labels field on the Goods Received Header screen – see "Maintaining the Goods Received Header". You can change the default label quantity for a specific item, while leaving the default quantity for all other items in the batch. |
|
|
Qty Labels |
If you selected Ask Quantity in the Labels field, enter the number of labels you want printed. |
|
|
Important Information |
Micronet displays any added text in the Supplier master file that is assigned to display as important information on goods received batches. |
Micronet saves the details of the item you have added or edited and redisplays the Enter Goods Received Line screen so you can continue adding or maintaining goods received lines.
|
|
|
Technical Tip 2.8 Feature If Micronet displays a message that you cannot allocate more units than you have received, it means that the quantity allocated to backorders, etc., is greater than the quantity received. You need to fix the over-allocation before you can proceed – see "Enter Goods Received Line - Allocations (v2.8)". |
Micronet redisplays the Goods Received screen showing all the items included in the goods received batch.